How to pass the OSCP in 30 days.
I want to begin by being completely transparent about my journey to becoming an OSCP. It is important to understand that I hold a bachelor's in Computer Science which I believe gave me a significant advantage in understanding certain material. I also was enrolled in Fullstack Academy’s Cyber Bootcamp. Aside from that, I have no professional work experience in InfoSec and, before starting my OSCP journey I had minimal knowledge of Linux.
With all of that out of the way let’s get to the reason why you’re here, how the heck do you pass one of the “hardest” pen-testing certificates with just 1 month of study?
Step 1: What are your intentions and where is your heart?
I know, not the first step you were expecting but, I believe that this is the most important step. Why do you want to get this certificate? Is it because you have a passion for pen-testing and want to prove to recruiters that you indeed know what you’re doing? Or is it just because you heard pen-testers make good money and you want in? It is important to understand that is going to get hard, very hard. The only thing that's going to keep you going after the motivation and excitement runs out is passion. In the words of Eric Thomas “When you want to succeed as bad as you want to breathe, then you’ll be successful”. I truly believe that this philosophy applies to passing the OSCP.
Step 2: Start with the basics.
Take some time before starting your OSCP studies to review Linux basics. You don’t need to memorize any of the complicated commands, Albert Einstein once said “Never memorize something that you can look up”. Don’t waste time trying to become a command-line ninja. In addition to getting familiar with the Linux command line, make sure you have an understanding of basic networking concepts.
Step 3: Python!
Being able to understand source code is a crucial part of passing the OSCP. In many instances, you will need to parse through an exploit to get a general idea of what the code is doing in order to tailor it to your specific needs. It’s not necessarily required for the OSCP but being able to script arbitrary tasks will save you lots of time during the exam.
Step 4: Lab Manuel
If you’re going to try and pass the OSCP in a month you probably won’t have time to read the entire lab manual from cover to cover. Here are the chapters that I think are essential to read (I didn’t list the name corresponding to the chapter so that Offensive Security doesn’t get mad at me.) :
- Chapter 4
- Chapter 7
- Chapter 8
- Chapter 9
- Chapters 10/11
- Chapter 14
- Chapter 16
- Chapter 18
- Chapter 19
- Chapter 22
This by no means implies that the other chapters are less important, just that if you’re on a time crunch it might not hurt to skip them.
I’ve read many OSCP study guides that say not to start the lab machines until you read the book but I don’t entirely agree with that. I think looking up how to do things while you’re trying to compromise the lab machines is a very efficient way to learn fast.
Step 5: GRIND!
Now that we’ve got all of that out of the way, It’s time to actually start hacking! When you get access to the PWK lab network you should begin with the machine named Alpha, followed by Beta. This is because there are really good write-ups for both of those machines in the PWK forums. I suggest reading through those write-ups carefully and making sure you understand every step and why that step was taken.
After you’ve knocked both of those machines out the way you can start making your way down the list of IPs. Here’s the strategy I took in attacking machines:
Spend the first two hours trying to compromise the machine on your own. If you’re not making any progress within two hours go to the forum for that machine and start going through the hints. (Shout out to the PWK forums community for being awesome and leaving hints for those struggling.) DO NOT SPEND MORE THAN 3–4 HOURS ON A SINGLE MACHINE! If you’re stuck for longer than 4 hours it’s time to move on to the next machine. If you spend longer than 4 hours struggling you are wasting time. More often than not another machine will give you a hint on how to get into the machine you were stuck on.
You should be attempting a minimum of 3 machines a day, this was taking me anywhere between 12–16 hours. When I say this is the time to grind I mean it.
Step 6: Notes
Good note-taking will be as important as actually rooting machines. I chose to use Google Keep as my method of note-taking. It’s essentially your own little google that you populate with the things you need. Here is a screenshot of a note I actually needed on the OSCP and was able to lookup by just searching SUID:
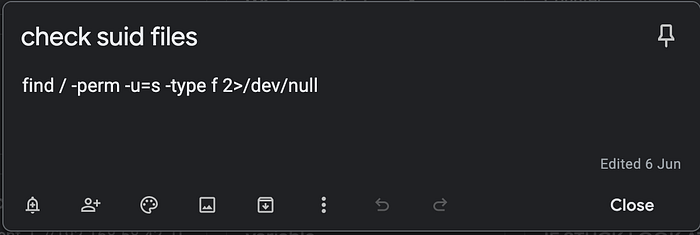
I hope that does a good job illustrating the power of Google Keep.
Step 7: The Exam
So you’ve come towards the end of your lab time. It’s time to schedule your exam. I know this is probably self-explanatory but if you’re a morning person, make sure you start your exam early. If you’re a night person then start your exam in the evening. Make sure you have snapshots of your Kali VM in case something goes wrong during the exam you have something to fall back on.
During the actual exam, I would recommend starting off with the BoF machine. There seems to be this misconception that the BoF machine is the hardest machine, but in my opinion, it’s the easiest machine. I say this because there are a specific set of steps to follow in order to root that machine. Essentially all you have to do is follow the guide in the PWK manual.
With the BoF machine knocked out and 25 points secured, you’re on your way to becoming an OSCP!
I don’t really think it matters which machines you start with. My strategy was to not spend longer than 2 hours on a single machine. If I was really hitting a brick wall, and boy did hit some brick walls, I would move on to the next machine. It’s really important to take a step back sometimes. You will end up going down a rabbit hole at some point and the only way to get yourself out of it is to take a step back.
Don’t forget to document everything you’re doing. Take screenshots of everything and have them saved in a folder respective to the machine you’re working on. This is going to help you A LOT while you’re writing your exam report.
Step 8: Try Harder!
At last, the exam is over! Whether or not you compromised enough machines to pass the exam you should be extremely proud of yourself. You are making a conscious effort to better yourself and your life. That will not go unnoticed by the universe.
If you failed, take a break, take a breath, then get back on your feet and try again. Remember, Thomas Edison had 1000 failed inventions before he came up with the light bulb.
If you passed, Congratulations! This is a big deal. The late Chadwick Boseman said,
“Savor the taste of your triumphs today, don’t just swallow them all whole without digesting what is actually happening here. Look down over what you conquered and appreciate what God has brought you through.”
Take the time to celebrate what you have achieved! You deserve it! But don’t just stop here. This is only the beginning. There are many battles ahead and you are on a road to greatness. Education is a lifelong journey and when you are faced with adversity always remember the lessons you learned during this battle, Try Harder!

